


Blogs
|
Even though there is always a mind-boggling amount of invaluable info shared on the Discovery Education Network (DEN), one of the best resources available is the Spotlight on Strategies (S.O.S) series, a must-see DEN favorite designed to provide teachers with simple yet effective instructional practices for using digital content to support student learning.
To date, there are 70+ teacher tried and tested strategies featured on the DEN blog and now thanks to Lance Rougeux, Vice President of Learning Communities and Educational Consultants at Discovery Education and all-around DEN tech guru, I will now be featuring these techniques on my space. Two thumbs up to this guy!
So, enough of that… Let’s fast forward to the good stuff…
This week’s spotlight: ABC Summary, a digital media strategy that focuses on summarization skills related to a video clip. Check out the details below.
Background
Summarizing requires that students distill information in a concise, synthesized form and focus on the important points presented in a text (Marzano, 2001). This strategy involves students sharing the responsibility for summarizing content. After watching a video, each student develops a summary statement beginning with a unique letter of the alphabet and then shares out to the whole group. The individual summaries can be compiled into one final product.
Technique
» Decide on how students will be assigned to alphabet letters. If using a random assignment you’ll need to prepare slips of paper, one letter per slip, that students can draw out of a hat.
» Select and preview a video. (Of course, Discovery Education videos are the bomb, but if you do not have a subscription to this amazing resource, then any video clip will do the trick.)
» Share video with students. Encourage note-taking by stopping frequently to discuss, define, or clarify information.
» Assign letters to students and explain that students will watch the selection a second time, this time with the focus being on developing a summary statement that begins with that letter.
» Replay segment.
» Provide time for students to craft A-B-C statements. Scaffold by allowing students to discuss with partners or small groups if necessary.
» Ask students to share statements in either small group or whole class format.
» Optional: Compile individual summary statements into a book, poster, etc.
Potential Applications
» Review of information gleaned from a video presented in class.
» Synthesis of multiple days of instruction with each student responsible for one letter of the alphabet.
» Group presentation format with students working in groups to research topics and then presenting a summary of their learning in the form of an A-B-C list rather than a written paper.
Example
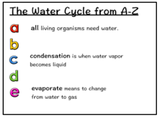
After watching a video on the water cycle students will craft statements to generate a "Water Cycle from A-Z" list. Sample shared below.
Click here to snag a PDF version of this super cool strategy.
So, there you have it—another S.O.S. trick to add to your edtech toolbox. Stay tuned for additional ways to activate learning in your classroom…
Like what you see? Then be sure to check out other ideas in this series:
» Reading Between the Lines
Edutech for Teachers team
.
Blog
.
<span class='date ' tip=''><i class='icon-time'></i> Jul 15, 2015 11:44am</span>
|
|
Time for the next tech-isode in my new "Tech It Up Tuesday" series in which I will share an edtech tool, app, site or other resource that can be utilized in the educational setting.
Regardless if it’s print or digital format, many students and adults alike love reading comics. But did you know this form of recreational reading can also be a powerful teaching resource? Yep, it’s true! I don’t know about you, but there’s nothing better than captivating another’s attention using comic strip style visuals and/or humor as the vehicle. Well, the survey says….. A super cool tool that provides students with the opportunity to do just that is Bitstrips for Schools. Most importantly, this web-based resource also enables them to demonstrate knowledge and creativity about a particular topic, regardless of artistic ability, using a fun setup.
I recently created a Bitstrips for Schools account and set up my first ever classroom for the Multimedia II course I teach. To get things rolling, I required students to create an avatar. Not only did this activity familiarize students with the interface, but by doing so, Bitstrips automatically generated this totally awesome group mug shot—one I’m now using to represent our class in various print and digital projects.
Is that just too funny or what?
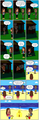
Anyway—I realize it’s not the most academic of examples, but check out the sample shown below demonstrating the potential of this edtech tool.
Not only does Bitstrips for Schools provide students with an option to save their comics as an image, but it’s also possible to snag an embed code that can be utilized to post an interactive version of the comic on blogs and other online spaces.
Warning Label: If you elect to utilize this very cool tool, you may find yourself messing around endlessly with all of the features, giggling like crazy and even forgetting to watch your favorite TV shows. (Yes, I know this from experience!) However, these side effects are well worth it! And trust me—your students will definitely agree!
In fact, while working on this project, I repeatedly overheard my peops discussing how creating comics was the coolest project we’ve done all year. Honestly—we’ve completed some really neat stuff since August, so that’s really saying something about the use of a resource such as Bitstrips for Schools to engage students in learning.
Classroom Connection:
Although the reasons for incorporating Bitstrips for Schools (or any comic generator) into classroom activities are seriously endless, one of my favorite involves enhancing student writing by making the process fun and visual. Equally appealing is providing a creative alternative for students to complete projects across the K-12 spectrum—biographies, historical events, poetry, examples of figurative language, math and science processes, vocabulary and foreign language practice and/or diaries to name a few.
Need some additional info regarding the use of comics in your classroom? Then check out the following Slideshare presentation from S. Hendy containing 26 ideas for implementation of this concept. There’s even a list of additional cartoon creation tools at the conclusion of the slideshow.
If that’s not enough—here’s another comprehensive resource worth viewing: Comics in the Classroom 100 Tips, Tools, and Resources for Teachers. This list of goodies will surely convince you of the why’s and how’s of using comics as a teaching and learning tool.
And if you really want to get all teched out, import student comics into an interactive tool such as Thinglink or augment them for even more depth of knowledge! Now that’s what I’m sayin’!
Bitstrips for Schools is just a few clicks away… Once you arrive onto this scene, you and your students will be creating comics for learning in minutes!
Edutech for Teachers team
.
Blog
.
<span class='date ' tip=''><i class='icon-time'></i> Jul 15, 2015 11:43am</span>
|
|
Innovation… Versatility… Performance… What teacher doesn’t want to provide the best technology has to offer for students? But with a plethora of choices, sometimes it’s overwhelming trying to determine what device best suits the needs of all learners. So, what should educators choose—the power of a laptop or the compact, lightweight portability of a tablet? Well, it’s no longer necessary to settle for one option when the best of both worlds are at your fingertips. Yep, it’s true. With the latest and greatest technologies currently available on the market, students now have access to the functionality of a laptop while also having the capability of completing captivating assignments and/or creating meaningful content via a tablet. And better yet: The instruction and learning goals can dictate the type of device being used as opposed to the reverse, which typically occurs in classrooms today. Sounds intriguing, doesn’t it?
In case you haven’t figured it out by now, I’m referring to a super cool technology known as the 2-in-1. Whether your students need to generate a document or spreadsheet, transfer files, read an e-book, capture photos or create media, this hybrid does it all with just one simple twist, click or flip. Not only is this option flexible and convenient, but cost-effective as well because schools no longer need to provide students with more than one device to achieve desired outcomes. It’s really all that—and much more!
In fact, it’s just what the edtech doctor ordered! The 2-in-1 hybrid model provides the learner with a perfect all-in-one tool, one that can be utilized in a variety of meaningful ways to promote 21st Century skills anywhere at any time.
So, how can the 2-in-1 be integrated into classroom activities? By minimizing restrictions and limitations, the possibilities that exist are seriously endless. Go ahead and give some of these fun yet effective strategies a test drive, and you’ll be wondering how you’ve ever operated without one of these devices!
1. Not Your Grandma’s Research Paper
After conducting research on a specific curricular topic and writing a paper or essay using a word processing application, students can bring the facts to life by creating a dynamic interactive image containing media rich links such as video and audio with the ThingLink web tool/app. Students not only love being engaged, but they also appreciate having the opportunity to discover new content, so why not use ThingLink as a means to explore information and/or extend learning related to a particular topic or concept. Interactive images can be viewed via the ThingLink web site, or as an added bonus, they can be embedded to a class or student blog, wiki or web page.
2. Join the QR Code Craze Quest
Take the old-fashioned treasure hunt to a high tech level using those souped-up bar codes known as QR codes. Keep things new and exciting by developing a digital scavenger hunt utilizing scannable images to get students physically and mentally engaged in learning about a specific curricular topic. As they move about the classroom visiting a variety of websites to gather information, students can also record their findings using a Google Doc or Form. Better yet, students could even create a digital presentation to demonstrate the knowledge they acquired from their web adventure.
There are tons of other uses for QR codes in the classroom, especially when students have access to a mobile device: Stations for self-directed learning, checking answers on an assignment, adding information to artwork and the list goes on. So, just go for it! Create your first code and then design some creative approaches to utilize this concept in your space!
3. Book Reports with a Digital Twist
Time to ditch those pencils and that paper and say hello to an alternative to the dreaded book report: A movie trailer. Using a tool such as Movie Maker, iMovie or VoiceThread, students are given the opportunity to produce and publish a multimedia project that encourages them to summarize and convey what they have read in a format similar to a film preview. Besides communicating meaning through the creation of a digital story, students are also analyzing the mood of a book and reflecting those emotions through the selection of corresponding music. Going beyond the traditional book report concept also has the potential to generate interest and excitement for reading by exposing others to some really great new literature.
4. Convey Concepts with a Medley of Images
Looking for a neat way to involve students in classroom activities? Well, of course, there’s an app for that! A favorite of mine—Pic Collage—is one you will definitely want to check out! It’s fast, fun and one of the best ways I have found to create awesome collages using a variety of photos, stickers, backgrounds, text, web images and freeform cutouts. Pic Collage—or a similar collage generator—can be applied to any learning experience. Yep, utilize one of these applications as a quick, easy and creative way for students to produce an original piece of work demonstrating their knowledge about a particular topic. A cool tool like this is also perfect for developing pictorial journals to highlight school and/or classroom field trips, activities, events and more!
5. May the Forms Be With You!
Take formative assessment to the digital level by having students show their understanding of content through completing forms, surveys and/or polls. Get the job done via tools such as Google Apps for Education or a variety of web resources and apps including PollDaddy, Survey Monkey or Socrative.
With a few clicks of a mouse or taps on a screen, teachers can obtain an instantaneous snapshot of what skills have been mastered and/or what needs to be reinforced at any point in a given lesson. In addition to instructional feedback, teachers can also acquire other valuable information from students such as interests, needs, assignment progress, etc.
Teachers can also extend learning by having students develop and distribute their own forms, surveys or polls. Once data is collected, they can compile and display their findings in a spreadsheet.
6. Transform Quotes into Visual Masterpieces for Learning
The use of quotes and/or images to motivate and inspire students is not a new concept. I personally incorporate both on a regular basis and can honestly say that this strategy is one of my most favorite ways to begin the class.
Of course, if you conduct a search for tools that can achieve this outcome, you will locate more than enough options. However, after several hours of experimenting, I found ReciteThis to be the perfect tool for teachers who are looking for a quick and easy yet powerful way to create their own quote images and/or who want their students to do the same.
If you need further justification for integrating tools like ReciteThis into your lessons, then use the visual literacy rationale. Why? Because we live in a world in which our students are constantly bombarded with images; thus, it is essential for them to have the skills to recognize, interpret and understand the context of these signs, pictures, graphics and/or symbols in order to make meaning of their environment.
Want to add another layer of technology in connection with quote images? Then consider utilizing Edmodo, an educational microblogging platform that allows students to share and discuss their responses to quote images in a collaborative online environment. Not only is this application engaging and relevant, but students really enjoy completing writing assignments in this manner.
7. Positively App-Smashing!
App smashing: The art of merging content from a variety of apps to generate a unique finished product. Sounds pretty nifty, right? That’s because this latest edtech craze is an app-solutley amazing way for students to really unleash their creativity… A way for them to not only demonstrate information about a particular topic but an opportunity for them to show off their tech-knowledge-y skills in a unique manner… To be innovative with mobile devices and digital media!
Of course, any of the previously mentioned activities can be combined to achieve the app smashing effect. For example, create a collage and then import it into ThingLink to create "hot spots" containing links to additional resources about a topic.
The app smashing concept can enhance learning while maximizing the potential of digital tools by merging their features and functions to create a pretty sweet final project—one that should be published to the web. After all, digital presence is the new resume!
OK, so let’s face it. We live in a digital society that is dominated by computers; consequently, the more adept students are at navigating them, the better equipped they will be to succeed in the "real world". Having a device that allows students to be both productive and inventive guarantees they will acquire the necessary skills to compete in an ever-expanding high-tech global marketplace.
This article is sponsored by by Intel Education. For more great ideas regarding the use of 2 in 1 devices with students, be sure to visit intel.com/2in1Everyone, where you’ll find strategies, suggestions and more!
Edutech for Teachers team
.
Blog
.
<span class='date ' tip=''><i class='icon-time'></i> Jul 15, 2015 11:41am</span>
|
|
As Quincy Jones once remarked, "I’ve always thought that a big laugh is a really loud noise from the soul saying, "Ain’t that the truth."
That said, Edu-fun Friday is a series devoted to adding some humor to the lives of teachers who visit this blog. After all, there’s nothing better than ending the week on a positive note! Plus, do we have the best topics to provide us with some comic relief or what?
This might explain all of the balloons I’ve seen around my school since introducing Google Drive!
Edutech for Teachers team
.
Blog
.
<span class='date ' tip=''><i class='icon-time'></i> Jul 15, 2015 11:40am</span>
|
|
Even though there is always a mind-boggling amount of invaluable info shared on the Discovery Education Network (DEN), one of the best resources available is the Spotlight on Strategies (S.O.S) series, a must-see DEN favorite designed to provide teachers with simple yet effective instructional practices for using digital content to support student learning.
To date, there are 70+ teacher tried and tested strategies featured on the DEN blog and now thanks to Lance Rougeux, Vice President of Learning Communities and Educational Consultants at Discovery Education and all-around DEN tech guru, I will now be featuring these techniques on my space. Two thumbs up to this guy!
So, enough of that… Let’s fast forward to the good stuff…
This week’s spotlight: 6-Word Stories, a digital media strategy that focuses on summarization skills related to an image. Check out this simple but effective idea below.
Background
According to Reading Rockets, "Summarizing teaches students how to discern the most important ideas in a text, how to ignore irrelevant information, and how to integrate the central ideas in a meaningful way. Teaching students to summarize improves their memory for what is read." By narrowing the number of words allowed, we require students to focus on the most important ideas and concepts of the content being shared.
Example
» Display a Discovery Education image such as "Family on Bike Trail". (Of course, Discovery Education images are the bomb, but if you do not have a subscription to this amazing resource, then any photo will do the trick.)
» Have students discuss what they see, guess what happened right before the image was taken, and predict what will happen next.
» Explain to students that they need to individually summarize the photo in 6 words or less.
» Have students share their summaries. Discuss similarities and differences.
» Pro Tip: Have students bring in their own pictures or draw images that represent the current topics being covered in class and have classmates create 6-word stories. Using these images, have students write creative stories with the 6 word caption as the title. Use iPiccy.com to create a collage or add captions on photos.
Challenge
» Select a video, image, or reading passage that corresponds with your current curriculum.
» Have students discuss what they see, guess what happened right before the image was taken, and predict what will happen next.
» Explain to students that they need to individually summarize the photo in 6 words or less.Have students share their summaries. Discuss similarities and differences.
Click here to snag a PDF version of this super cool strategy.
So, there you have it—another S.O.S. trick to add to your edtech toolbox. Stay tuned for additional ways to activate learning in your classroom…
Like what you see? Then be sure to check out other ideas in this series:
» Reading Between the Lines
» ABC Summary
Edutech for Teachers team
.
Blog
.
<span class='date ' tip=''><i class='icon-time'></i> Jul 15, 2015 11:39am</span>
|
|
Time for the next tech-isode in my new "Tech It Up Tuesday" series in which I will share an edtech tool, app, site or other resource that can be utilized in the educational setting.
This week the focus is on NicerTube, a nifty web tool that allows users to get rid of all of the fluff, distractions and sometimes less than desirable content associated with YouTube videos so they can be shared via an easy to view page. Yep, it’s really that cool—and simple too! Read on to find out how the magic works.
Find a useful YouTube video to enhance classroom content. Copy the URL and paste it into the NicerTube interface. Then choose a background type from three available options including web page, solid color or other design (such as holiday, birthday, nature and texture themes). After selecting the "click to continue" button, a new URL is generated—one that can be copied and shared with others as desired.
So, basically—NicerTube turns this…
Into this…
No more worrying about what types of questionable stuff may pop up when you’re showing a video in class. Pretty neat, eh?
Oh, and just so you know—There is no registration or sign-up required to use NicerTube.
Tech Tip: If your school blocks YouTube, this tool may or may not work with your filter. To be sure, check out the link before you attempt to utilize it with students.
Classroom Connection:
Use NicerTube to eliminate unnecessary distractions from YouTube videos so students can better focus on the content at hand.
Edutech for Teachers team
.
Blog
.
<span class='date ' tip=''><i class='icon-time'></i> Jul 15, 2015 11:39am</span>
|
|
Join me in the TL Virtual Cafe on Monday, March 2 at 8:00 p.m. EST to learn more about how to rock out your classroom with interactive learning journeys and app smashing using ThingLink.
Just use this participation link to hang out with the Geeky Girl as she she shares more about incorporating this super cool edtech tool into curricular activities.
Hoping to connect with you soon!
Edutech for Teachers team
.
Blog
.
<span class='date ' tip=''><i class='icon-time'></i> Jul 15, 2015 11:39am</span>
|
|
Every teacher knows that visual aids are a good way to facilitate the learning process and grab students’ attention for a long time. Educators use different posters, videos, slideshows to explain a new topic, provide more details or even test students. Presentations take a prominent part in the visual aids collection. Their main benefit is that teachers can combine various types of content in one presentation: text, images, video clips, music. Saved in a video format, presentations can be easily shown in class, uploaded to YouTube, embedded into a school website, or shared on any other educational resource.
Several years ago, teachers had a limited choice of software to create presentations. Namely, there was only one tool for all presentation needs: Microsoft PowerPoint. With it, educators created, edited, and showed their presentations to students. The software was often non-responding in the most crucial moment. To say more, unskilled users often corrupted PPT files, did undesired edits, and simply could not show their works in incompatible school PC operating systems. Only a couple years ago, Microsoft added the possibility to save presentations in popular video formats and upload to YouTube. At the same time, there appeared a great deal of free alternatives, which allowed teachers to create video presentations much easier and faster than with PowerPoint. Here are the most prominent of them.
» Prezi
Prezi is a wonderful web tool to create stylish presentations on a certain template. To tell the truth, there are so many ready templates and they are so beautiful, so sometimes it is hard to pick just one. When you chose a template, you have to add your content to slides. You may easily insert images, YouTube videos, background music and even paste a PDF file. On each stage of presentation development, you can preview your work. With a free account, users have the option to save a ready presentation in your Prezi account, download as PDF, or share on Facebook. However, you may easily record your presentation with Sreencast-o-matic, Jing, or any other screencast software and show it as a video in class.
» Slideshare
Slideshare is not only a great service to create presentations, but a giant presentation hosting. Here you can find ready presentations on any topic. Most of them are downloadable. To create your own presentation, launch a free account, proceed to "Create" tool, pick up theme/font, and start adding content to slides. You may change the layout of text and images; add lists, charts, tables, etc. The site has a big collection of stock images, so you can easily find an appropriate picture if you do not have any. Once your presentation is ready, you may publish it on Slideshare and show online, screencast it in video, or download as PDF.
» Powtoon
Powtoon is new resource for creating presentations and animated videos for your lessons. To create a slideshow, choose a style out of dozens available and add your content (text, sound, videos) onto a ready template. To save the result as a video, you need to switch from slideshow to movie mode and click "Export". However, with a free account you will be able to upload the video to your YouTube channel. The workaround here is to download the video with some YouTube downloader which are numerous nowadays.
» Freemake Video Converter
Freemake is a free Windows software, with which you can unite several images and videos into a slideshow. It is very handy when you do not need to add any text or lists to your presentation and just want to make it as a series of images or short videos. You can add any background music to your slideshow and save it in any popular video format or upload to YouTube.
» Slide.ly
Slide.ly is another great online tool to create beautiful video presentations for free. Just upload your images, add music from YouTube or your PC, pick up a theme, and save your slideshow. The only drawback is that you cannot download the file onto your PC. Still can publish it on social media channels, send by email, or embed onto a website. In addition, you may also use the screencasting software mentioned above to record the presentation in a video format.
Author’s Bio
Elena Vakhromova is a blogger at MP3jam known for free MP3 download software for Windows. Elena loves testing and writing about free software and apps which bring real value to users in all spheres of life.
Edutech for Teachers team
.
Blog
.
<span class='date ' tip=''><i class='icon-time'></i> Jul 15, 2015 11:38am</span>
|
|
It’s Tuesday, so you know what that means… It’s time to "Tech It Up" with another cool tool that can be utilized in the educational setting.
So, let’s get right to it. This week’s shout out goes to Photos for Class, a site that’s ideal for safely searching for images that can be incorporated into classroom lessons, activities and projects.
Besides providing G-rated images via Flickr and proprietary filters, downloaded images also include citations that are automatically generated by the web tool. Attribution includes name of the author and photo, a link to the original photo and the name and type of license as well as a link to the licensing terms. How cool is that? No more worrying about the copyright police banging on your door. Photos for Class has got you covered!
Check out the example I located and saved using the Photos for Class image search engine. Is it obvious where my mind continues to wander as Central PA is enduring yet another blast of winter weather?
Oh, and get this: If you really dig this tool, there are a few more ways you can make the best use of it. First off, insert a few lines of code that will add a Photos for Class search bar directly to your site. Yep, this is a fan favorite! Another bonus: If you are an Edmodo user, you can install the Photos for Class app straight from the Edmodo Store. Check out additional info about these options here.
Classroom Connection:
Students are always in search of visually appealing images for all types of digital and print projects. True statement. But in addition to learning how to successfully locate this type of media via the Internet, we—as educators—are also responsible for teaching our students how to properly cite materials obtained from others. Photos for Class is the perfect solution to simultaneously meet both of these needs.
And that pretty much sums it up. Safe. Simple. Useful. And free! My kind of resource. Be sure to add this cool tool to your tech-box!
Edutech for Teachers team
.
Blog
.
<span class='date ' tip=''><i class='icon-time'></i> Jul 15, 2015 11:38am</span>
|
|
Even though there is always a mind-boggling amount of invaluable info shared on the Discovery Education Network (DEN), one of the best resources available is the Spotlight on Strategies (S.O.S) series, a must-see DEN favorite designed to provide teachers with simple yet effective instructional practices for using digital content to support student learning.
To date, there are 70+ teacher tried and tested strategies featured on the DEN blog and now thanks to Lance Rougeux, Vice President of Learning Communities and Educational Consultants at Discovery Education and all-around DEN tech guru, I will now be featuring these techniques on my space. Two thumbs up to this guy!
So, enough of that… Let’s fast forward to the good stuff…
This week’s spotlight: What Did They Say?, a visual literacy strategy that focuses on using content-based images to practice and reinforce writing and vocabulary skills while sharing subject matter knowledge.
Background
If you ask a student what it takes to do well in social studies, they may likely say a good memory. Historians disagree. It’s much more than that. "To historians, history is an argument about what facts should or shouldn’t mean. Even when historians are able to piece together the basic story of what happened, they rarely agree about what an event means or what caused it. Historians argue about the past’s meaning and what it has to tell us in the present." (Thinking Like a Historian- Wineburg)
How do we help change students’ perspective? We do that by putting them in the picture.
Example
» Find a primary source image. This could be a painting or historical photograph.
» Have students discuss what they see, know, and wonder about the image.
» Find a collection of resources (videos, reading passages, audio files, etc.) about that event or time period to support students’ understanding of what events actually took place.
» Have students use sticky notes to create speaking or thought bubbles above the character’s head and fill in with something that individual could have likely said or been thinking at the time of the image.
» Allow time for students to share in small groups and provide evidence to support why they chose their statements. They should look for similarities and differences in their choices.
» For an added bonus, have students re-enact the image.
Click here to snag a PDF version of this super cool strategy.
So, there you have it—another S.O.S. trick to add to your edtech toolbox. Stay tuned for additional ways to activate learning in your classroom…
Like what you see? Then be sure to check out other ideas in this series:
» Reading Between the Lines
» ABC Summary
» 6-Word Stories
Edutech for Teachers team
.
Blog
.
<span class='date ' tip=''><i class='icon-time'></i> Jul 15, 2015 11:37am</span>
|