


Blogs
|
These instructions were originally produced as a worksheet which can be downloaded here:
Creating a Site in Frog Learn.pdf
1. Log into Frog Learn
2. On the top menu (the black bar) - go to Frog Drive.
3. Select Sites / My Sites and a folder of your existing sites will open.
4. Press New Site
5. Give your site a title and description (this can be edited later).
6. You will then need to select a theme and icon for your site. A theme is the design of the site (the background and containers). Frog will use the title and description to suggest an icon for your site, or you can upload your own (both can be edited later). Then press Next.
7. Now you have the option to give further information about your site to help others find it in the search box in Frog. You should include any keywords, the subject and key stage here, after selecting remember to press "Add Tag", so that the tag appears on this page. This information is optional and it is possible to create a site leaving this blank.
8. Finally press "Create Site" - you will now have a blank site to add content to.
More details on adding content to a site can be found in these posts:
Frog Learn Widgets and Apps Guide
Embedding in Frog Learn
Andrew Caffrey
.
Blog
.
<span class='date ' tip=''><i class='icon-time'></i> Jul 20, 2015 07:06am</span>
|
|
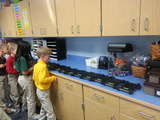
By Second Grade Teacher Julie StewartWe have had our share of memorable moments since receiving our Nexus 7 tablets. Things like charging multiple tablets and having non-homeroom students also using the tablets was now on my list of daily things to manage. It was going to be so easy...I did not think too much about it, at first, because I thought it would be one of those easy tasks that did not take a lot of effort. When the tablets needed to be charged, I would just plug them in. It all seemed so simple. I suddenly found myself wondering how was I going to do this, and where on earth do I put them in my already crowded classroom? The minor problem came when I realized that I did not have enough power strips on hand. I called my teammate, Beth, and asked if she had some that I could use. Thank goodness for the IT department for having a secret stash of odds and ends for technological emergencies! With her spares, I had enough to set up charging stations all over my classroom on any horizontal or vertical surface that was available.Before I could actually start plugging them in and charging them, my next task was to remove each charger from its box and take off the plastic bags and ties. After I got the USB cables plugged into the charging units, the tablets were finally ready to be charged. As I started this task, my college-aged son, Stephen, stopped by my classroom to lend me a hand. He helped me find a few more open outlets for the power strips, and we got them all plugged in and charging in less than 10 minutes. They were scattered all over my classroom, but each tablet had a home to charge. My "Oh, no!" moment was no more!I had mentioned in an earlier post that it was important that I have identification names and numbers on all of the tablets. This was done to prevent major "Oh, no!" moments. Since my school does ability grouping for math and reading, my class decided that we should share our tablets with the other second graders who have me as their math and reading teacher. Doing this has allowed me to put the Nexus 7’s into the hands of close to 75 second grade students! This kind gesture made the other second grade classes very happy. By assigning each guest student a specific tablet, I have made all of them accountable for using them. This, along with adding LanSchool to each tablet, has made the students very aware of computer security. It also prevents 25 students from asking me all at the same time as to which one they should use!A funny moment happened one day when I heard an "Oh, no!" from one of my homeroom students when she was looking at her photos in her photo gallery. She brought her tablet over to me to see. One of the guest students assigned to her tablet had been exploring the camera feature while usng her tablet and snapped a self portrait. My homeroom student remarked, "Well, it is okay, Mrs. Stewart. She took a really good picutre, and now you don’t need to show her how to use the camera. She will be an expert pretty soon." All I could do was smile! This is the kind of moment that makes this teacher pretty darn happy.My next post will be showcasing some of the work the students have done out in the field using their tablets and the camera to show their creative "wow" moments. You will be amazed at what they did with just a few minutes of instruction on using the camera feature and being set free on their photo safari in and around our school.
EdTechTeam
.
Blog
.
<span class='date ' tip=''><i class='icon-time'></i> Jul 20, 2015 07:06am</span>
|
|
With over 800 Chromebooks now in the academy - here are the results of the Chromebook Survey for 2014:
View the previous survey here.
Andrew Caffrey
.
Blog
.
<span class='date ' tip=''><i class='icon-time'></i> Jul 20, 2015 07:06am</span>
|
|
So a few days ago Zeb was leaving the house and told me he was going to a doctors appointment. Being the nosey wife I am I inquired for what. "Just a check up.", he stated. "A checkup for what?", I replied. "Oh, just the usual.", he said. Now I had noticed he was limping around but I thought he had just pulled a muscle or something. Later on that day I was talking with the girls and one of them mentioned "Dad's foot". Inquiring minds had to know more so I found Zeb and asked to see his foot. Boy, was I surprised! From the knee down he was black and blue all over. Take a gander at the picture below.Turns out he was playing basketball and took out one of the players accidentally. That player was fine but fell on top of Zeb's leg apparently. It wasn't until a few days later that I found out the "player" was his brother Mitch. I should've known since Mitch already has a reputation for hurting my husband. :)The doctor says nothings broken at this point but some of us are wondering because the swelling is quite large. Guess time will tell but in the mean time just call Zeb "Hop-a-Long."
EdTechTeam
.
Blog
.
<span class='date ' tip=''><i class='icon-time'></i> Jul 20, 2015 07:06am</span>
|
|
Chrome Extensions are small add on’s for the Chrome Browser that can provide shortcuts and additional functionality to Chrome. Here are some great extensions for teachers to use in Chrome:
Awesome Screenshot
Enables you to capture screens, or areas of a screen in one easy move. Much easier and faster than using Print Screen then cropping the image. The delayed capture is useful if you need to use your mouse to highlight or press something - while the screen is captured.
Draftback
Draftback is an extension which runs in Google Drive and allows you to play back the creation of a document - a sort of timelapse movie for documents. You can see how much or how little time has been spent creating a document.
Turn Off the Lights
Makes the rest of a page fade to black when a movie is played. Useful when showing a film to a class as it hides other content.
Google Mail Checker
Displays the number of unread e-mails you have.
Adblock for YouTube
Stops adverts from playing before you show a video. Particularly useful if you rely on YouTube in Assemblies.
One-Click Timer
If you like to give accurate times for your class to complete an activity this extension displays a nice big clock. Even if you browse other sites it keeps counting down until the alarm sounds.
Date Today
When pressed shows the Date and Time. Useful for the "put today’s date at the top of the page" moment..
Send Later
Sends g-mails at a later time or date - useful when you remember to send an e-mail late at night, but want it to go the next day.
If you have another suggestion for a useful extension - leave it as a comment below..
Andrew Caffrey
.
Blog
.
<span class='date ' tip=''><i class='icon-time'></i> Jul 20, 2015 07:05am</span>
|
|
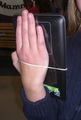
By Second Grade Teacher Julie StewartWe set out one afternoon before fall break to take in the beauty of the autumn colors. Our weather was changing fast, and we needed to get outside and snap some pictures before all of the leaves ended up on the ground. Because we did not have a fancy tablet cover for our Nexus 7 tablets, taking them outside was something that we were a bit nervous about doing. Our technology teacher, Beth Mossholder, came to class with a solution...Rubber bands! You heard it right. We could do this inexpensively and make it work! Each child was given a rubber band and instructed to attach it to the tablet by slipping their non-writing/typing hand through the rubber band on the back of the Nexus 7. It worked beautifully! It was quick and secure, so we could venture outside the classroom and begin our autumn photo safari around the school grounds. As they made their way outside, I could hear conversations about what they would take pictures of, how they were going to do it, and how they would help each other. We were ready for our adventure!Three Simple Steps For a Successful Autumn Photo Safari1. Add a rubber band and you are instantly ready to take pictures almost hands-free.2. Head outside to capture the beauty of autumn with a Nexus 7 tablet.3. Share photos with the teacher.I have to say that the camera on the Nexus 7 tablet did a great job and did not disappoint anyone. Even though this tablet just has a front facing camera, a student discovered that by holding it over your shoulder or off to the side, you could see the picture that you were taking. It is not as good as having the added feature of a rear facing camera, but it worked and they got some really good pictures. We headed back inside and shared photos and photography tips! There was even time for peer-to-peer teaching. One of my "expert" students showed the rest of the class a faster way to view their pictures. (I loved how they actually listened and had questions for her at the end!)Autumn through the eyes of a child and a Nexus 7 tablet! I do believe that their photo safari was a success!
EdTechTeam
.
Blog
.
<span class='date ' tip=''><i class='icon-time'></i> Jul 20, 2015 07:05am</span>
|
|
This post could also be titled: "What I meant to share during yesterday's glitchy demo slam..." ;)When teachers talk about using Chromebooks as student machines, they often lament the lack of multimedia editing tools for student projects (such as the iLife Suite that has for years made Macs an excellent choice for student use and 1:1 programs). Chromebooks, of course, don't have any local applications... just a fast, secure, and feature rich browser... work is created and stored "in the cloud."Google Docs (now Google Drive) has been an amazing web-based creation and collaboration tool for years, but now that Google Drive is a platform and an ecology of apps is evolving, more and more options are available for the "iLife like" experience on the web. Here are three Google Drive Apps that I shared during the demo slam at the Google in Education Summit yesterday.Pixlr Editor for editing images (a photoshop analog)UJAM for creating music (a GarageBand analog)WeVideo for editing video (an iMovie analog)While these web-based apps may not be as mature as their harddrive based equivalents... look what is possible on the web today! And imagine what is to come. You might browse the collection Drive Apps in the Chrome Web Store to get a better glimpse of what your browser is now capable of doing. :)Personally, I moved almost completely into the cloud almost two years ago and have never regretted it... it's been amazing too watch how quickly the pace of change in the browser has accelerated, and though I'm no expert in this new breed of online apps, I'm excited about what they mean for the accessibility, usability, and portability of student data, media, and computing/creating/collaborating experiences. Let me know in the comments if you have other favorite Drive Apps... and please share any success stories (or challenges) you might already have experienced personally or with your students.
EdTechTeam
.
Blog
.
<span class='date ' tip=''><i class='icon-time'></i> Jul 20, 2015 07:04am</span>
|
|
The one missing link in Google Classroom seems to be its ability to show the deadlines of set work in your Google Calendar. The Google Apps Script below does just that, adding assignment deadlines to your calendar and along the way creating a Google Sheet of all your assignments too. It does this by picking up the incoming e-mails sent out when new assignments are set, reading them and adding them to the sheet and calendar.
There are two versions of the script here - with slight differences in how the e-mails are handled in GMail.
Version 1 - In this version you need to set a filter to star all assignments from Google Classroom that arrive in your inbox. Once the script runs the star is removed. This is the most accurate way of running the script as it is removed from each GMail message in turn - no matter how many assignments you have. However when doing this you cannot use the star feature in GMail for anything else (because if you do the script will try to read it and then remove the star).
Version 2 - In this version you need to set a filter to add a label to incoming assignments called "Classroom". Once the script runs it will add the assignment to the calendar and then remove the label. The problem with this method is that if more than one assignment has arrived it will only add the first one to the calendar and then remove the label from all the e-mails. This problem is caused because Google Scripts do not have an option to remove a label from a single message (like they do for stars). You can overcome this to some extent by setting the script to automatically run very often (perhaps every 5 minutes).
How to set up
1. You need to filter your e-mails in GMail. Go to Setting (the cog on the top right) and then settings.
2. Once the settings menu opens, go to Filters and add create a new filter. This filter needs to pick up any e-mails with the Subject "New Assignment*" and either star it or apply a label depending on which version of the script you are using.
3. Now you have the filter set up you can add the script - which is done in Google Drive. Go to New and Script. If you cannot see the Script option you may need to go to Connect More Apps and add the Script Option.
4. Now copy the correct version of the script below into the script area.
Version 1 -
Version 2 -
5. Now save the script and run it - on the first occasion you run the script it will ask for permission to use your mail, drive and calendar. You will get an error message if there are no e-mails for it to find (either starred or in the folder).
6. You probably want to trigger the script to run automatically in the background - go to Resources and All Your Triggers to set the script to run - you can run it as often as needed - make sure you turn notifications off - otherwise you will get a notification every time the script fails, which is every time there are no e-mails for it to find.
The outcome of the script is that your assignments will be shown as all day events in Google Calendar on the day they are due. You will also have a Spreadsheet called "Classroom Assignments" in Google Drive which stores the details of all of your assignments.
If your a teacher - you could use this to set up a homework calendar.
There is nothing original here and I made this using lots of other posts on the web about Google Scripts and how to use Regular Expressions - feel free to have a play and adapt the script to your own use. It should be possible to do other things with the data, such as pushing it to twitter or to a text message. If you do something great post about it in the comments below…
Andrew Caffrey
.
Blog
.
<span class='date ' tip=''><i class='icon-time'></i> Jul 20, 2015 07:04am</span>
|
|
Well...here we are again on the annual trip to the ISTE conference! As of this writing, I’m on the plane to San Antonio, Texas writing this on a Chromebook Pixel with offline Google Docs. Despite the misnomer, there are many things you can do on a Chromebook without Internet access. To be fair, the experience would be far better with web access (come on United! Get wifi on all your planes!), but I would argue that even my Macbook Pro is mostly useless without wifi as I primarily live/work/play on the web--not with offline, desktop-based apps. But I digress...I love travelling to ISTE because I nearly always run into someone I know at the airport on the way there. This year, I ran into Bill Selak (a 2013 ISTE Emerging Leader award recipient!). We both checked in on Foursquare and I received a notification that a friend of mine was nearby as a result. It turns out we were actually on the same flight! It’s always fun to connect up with other educators in unexpected ways through these tools that we’re now taking for granted. I look back and even five years ago most of this would have been a pipedream. That’s what makes tech--and, specifically, edtech, so much fun. We get to experience the future now. I’m really looking forward to seeing many people I haven’t seen in some time now along with meeting new friends. My schedule isn’t too packed this year so I’ll have more time to chat and visit than I have in the past. I’m leading one half-day workshop Android App Inventor Bootcamp with fellow Google Certified Teacher, Brian Van Dyke. I look forward to helping guide educators through getting started with App Inventor while Brian reglales them with tales of working with the Google CAPE program and his conversations with Hal Ableson of MIT’s famed Media Lab. I’m also spending a bit of time at the Google booth where I’ll be presenting on Google Tools and Creating Presence in the Online Classroom. It’s a 30 minute session in the teaching theatre at the Google booth on Tuesday at 12:00 PM. Hope to see you there. If you can’t make my session, then be sure to check out all of the amazing educators who will be presenting on various topics for 15-30 minutes each. Some standouts include:Jim Sill - Making Movies with YouTubeJennie Magiera - Google School Makeover- 10 ways Google Apps for Education will revolutionize your schoolMonica Martinez - Three Easy Ways to use Google Drive in the ClassroomJulene Reed - Google+ for Personalized Learning and CollaborationJason Markey - Leverage the Web with ChromebooksDan McDowell - Collaborative Essays with Google DocsMolly Schroeder - Chrome Ninja Tips and TricksAs usual, I’ll spend quite a bit of time in the vendor hall walking the aisles and talking to old and new friends as well as checking out their wares. Particularly, I’m very interested in cost-effective iPad and Chromebook carts, storage cases for Chromebooks, blended learning solutions for grades 3-6, and the list goes on.My final thought on ISTE before landing in San Antonio is that I’m really wondering when ISTE will truly be international and host a conference outside the United States. In the past year of hosting Google in Education Summits both in the U.S. and internationally, I’ve had the fortune of travelling to New Zealand, Australia, and Canada. I have found the practice of getting outside of the United States helpful in reshaping my perspective on the education landscape and I do think that’s hard to do when you’re on familiar ground--even if you’re among like-minded peeps. What I learn from my travels and visits to other locations and schools I bring back to my school district in the form of new ideas for learning spaces, instructional strategies, and different thoughts about student learning and assessment. It’s refreshing. I look forward to the time when ISTE truly goes international.Note: all hyperlinks and images were added in after I landed and had wifi connectivity.
EdTechTeam
.
Blog
.
<span class='date ' tip=''><i class='icon-time'></i> Jul 20, 2015 07:04am</span>
|
|
Google Classroom is great for setting work, but assignments are only visible by the students and you. Often you want to share these with other staff and parents, without adding them to all the classroom student list, or perhaps you want to track assignments set by staff across the school.
This idea uses a script I have written here - about how to get Google Classroom assignments to a Calendar.
1. Firstly set up a new account - ideally one just for this task. In our case we called the username "homework@… "
2. Then add the Google Classroom Script as detailed in this post.
3. Now ask all the staff you want to collect assignments from to add this user to their Google Classroom groups.
4. Our new user account will now be getting lots of assignments, with all the details going into a spreadsheet and their calendar.
5. The calendar can be shared - or you could embed the calendar in a webpage, as agenda view to show a list of upcoming assignments.
Andrew Caffrey
.
Blog
.
<span class='date ' tip=''><i class='icon-time'></i> Jul 20, 2015 07:04am</span>
|